# Node-RED
The PixelIt extension (opens new window) creates screens and manages playlists in Node-RED (opens new window). The playlist runs in Node-RED, which must remain running to rotate screens.
These instructions describe node-red-contrib-pixelit 0.5.3 with PixelIt firmware 2.6.0. The package requires Node.js 22 or newer and Node-RED 2 or newer; also meet the requirements of your installed Node-RED version. The documentation site's own Node.js version is independent of this runtime requirement.
Install the package through Manage palette → Install, then restart Node-RED. Command-line installation in your Node-RED user directory is also supported; see Adding nodes (opens new window).
New to Node-RED?
Start with the Node-RED getting started guide (opens new window).
# Beginner Flow
Import the following flow, open Set your PixelIt IP, enter the device IP in Core, and deploy. Click Display text to send a five-second text alert. The flow uses only this package and built-in nodes. A Function node converts the Text node's font flag to a JSON boolean; package 0.5.3 otherwise forwards bigFont as a string. Without a device IP or MQTT connection, it only shows the generated message in Debug.
For MQTT, connect Core's output to an MQTT Out node configured to use msg.topic. Match Core's Master-Topic to the device's prefix, for example pixelit. Leave the IP empty for MQTT-only operation; setting an IP as well sends commands over both transports.
Importable quick-start flow
[
  {
    "id": "pixelit-example",
    "type": "tab",
    "label": "PixelIt quick start",
    "disabled": false,
    "info": "Set the PixelIt IP in Core. Inject Display text to send a five-second alert."
  },
  {
    "id": "pixelit-inject",
    "type": "inject",
    "z": "pixelit-example",
    "name": "Display text",
    "props": [
      {
        "p": "payload"
      }
    ],
    "repeat": "",
    "crontab": "",
    "once": false,
    "onceDelay": 0.1,
    "topic": "",
    "payload": "Hello PixelIt!",
    "payloadType": "str",
    "x": 130,
    "y": 100,
    "wires": [
      [
        "pixelit-init"
      ]
    ]
  },
  {
    "id": "pixelit-init",
    "type": "Screen Init",
    "z": "pixelit-example",
    "name": "Five seconds",
    "inscreenName": "hello",
    "induration": "5",
    "x": 330,
    "y": 100,
    "wires": [
      [
        "pixelit-text"
      ]
    ]
  },
  {
    "id": "pixelit-text",
    "type": "Text",
    "z": "pixelit-example",
    "name": "Message text",
    "intextString": "{{msg.payload}}",
    "inbigFont": "false",
    "inscrollText": "auto",
    "inscrollTextDelay": "110",
    "incenterText": "true",
    "inposX": "0",
    "inposY": "1",
    "incolorHex": "#FFFFFF",
    "incolorR": "255",
    "incolorG": "255",
    "incolorB": "255",
    "x": 520,
    "y": 100,
    "wires": [
      [
        "pixelit-font"
      ]
    ]
  },
  {
    "id": "pixelit-font",
    "type": "function",
    "z": "pixelit-example",
    "name": "Normalize font flag",
    "func": "msg.text.bigFont = msg.text.bigFont === true || msg.text.bigFont === \"true\";\nreturn msg;",
    "outputs": 1,
    "noerr": 0,
    "initialize": "",
    "finalize": "",
    "libs": [],
    "x": 700,
    "y": 160,
    "wires": [
      [
        "pixelit-alert"
      ]
    ]
  },
  {
    "id": "pixelit-alert",
    "type": "Alert Screen",
    "z": "pixelit-example",
    "name": "Display immediately",
    "x": 730,
    "y": 100,
    "wires": [
      [
        "pixelit-core"
      ]
    ]
  },
  {
    "id": "pixelit-core",
    "type": "Core",
    "z": "pixelit-example",
    "name": "Set your PixelIt IP",
    "ip": "",
    "uuid": "",
    "masterTopic": "pixelit",
    "x": 960,
    "y": 100,
    "wires": [
      [
        "pixelit-debug"
      ]
    ]
  },
  {
    "id": "pixelit-debug",
    "type": "debug",
    "z": "pixelit-example",
    "name": "PixelIt MQTT message",
    "active": true,
    "tosidebar": true,
    "console": false,
    "tostatus": false,
    "complete": "true",
    "targetType": "full",
    "x": 1220,
    "y": 100,
    "wires": []
  },
  {
    "id": "pixelit-help",
    "type": "comment",
    "z": "pixelit-example",
    "name": "Start here: configure Core, then click Display text",
    "info": "Set your PixelIt IP in Core for HTTP, or connect Core to a built-in MQTT Out node using msg.topic. Without an IP or MQTT connection, inspect the generated message in Debug. Click Display text to show a five-second text alert. No third-party nodes are needed.",
    "x": 400,
    "y": 40,
    "wires": []
  }
]
The package also includes playlist, animation and control flows under Import → Examples → node-red-contrib-pixelit. Store each named screen using Screen Data Update before starting a playlist. Send an empty playlist array to stop rotation. Alerts interrupt rotation temporarily; sleep mode pauses it.
# Core Nodes
# Core
Core stores screens, plays playlists and sends commands to PixelIt.
It receives screen updates, alerts, playlists and display controls, and can resolve Pixel Gallery IDs through the external bitmap API. Gallery downloads depend on that service and network access; inline pixel data does not require a gallery lookup.
# Configuration
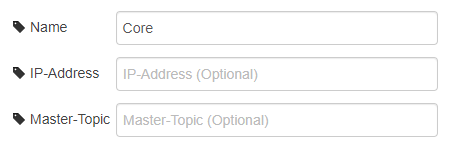
- Name: This value can be chosen as you like.
- IP address: Enter the device IP to send commands through HTTP. Leave empty when using MQTT only.
- Master-Topic: The MQTT prefix used to generate
msg.topic. Connect Core to an MQTT Out node; Core does not connect to the broker by itself. - UUID: Enter the device ID when resolving gallery IDs through the bitmap API.
# Alert Screen
Send an alert to display a screen immediately instead of waiting for its playlist slot. Use Screen Init to set its duration.
# Screen Data Update
Store or replace a named screen without immediately displaying it. Screen names in Playlist Update must match these stored screens.
# Matrix Control
Pass msg.sleepMode or msg.brightness through this node to Core. Send wake and brightness commands separately; firmware wake messages can restore the previous screen and return before processing brightness.
# Example
msg.sleepMode = true;
return msg;
# Playlist Update
This node receives the playlist and passes it on to the core node.
# Example
msg.payload = [
  {
    screenName: "clock",
  },
  {
    screenName: "smartmeter",
  },
  {
    screenName: "weather",
  },
];
return msg;
TIP
Use an Inject node to send the array as msg.payload. Start playback after all referenced screens have been stored. Use positive screen durations in seconds, up to 2147483; an empty array stops rotation.
# Matrix Config
The node is still included in package 0.5.3. Prefer the Webinterface or the configuration API for complete configuration: this node only sends a legacy subset of settings, and its matrixtBrightness field does not match the firmware's matrixBrightness field.
When maintaining an existing flow, open the node, save with Done, and deploy to migrate its MQTT password into Node-RED credentials. Outgoing configuration messages still contain the password; keep those messages out of Debug output and flow exports.
# Screen Nodes
Screen nodes add fields to the message, which Core converts into a firmware screen payload. You can also build those fields in a Function node. Node-RED screen names and playlist durations are integration metadata, not firmware REST endpoints.
TIP
Use the Node-RED Debug node to see the JSON object that is created by the screen nodes. Enable Complete msg object to see the complete JSON object, because many values are set to the msg object directly and not to the payload.
# Screen Init
Screen Init sets the screen name and display duration in seconds.
# Configuration
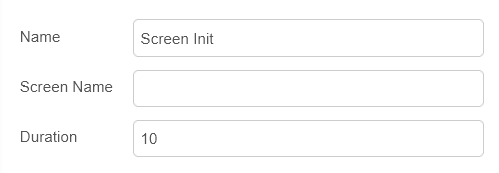
- Name: This value can be chosen as you like.
- Screen Name: Not relevant for alerts, but important for screens as this name is used in the playlist.
- Duration: The duration of the alert/screen in seconds, this value can also be passed dynamically by passing the message property in double braces. Set
msg.durationand access it with{{duration}}.
# Switch Animation
Switch Animation is the node to set a transition animation.
- Enables or disables the transition animation.
- Set the type of transition animation.
# Configuration
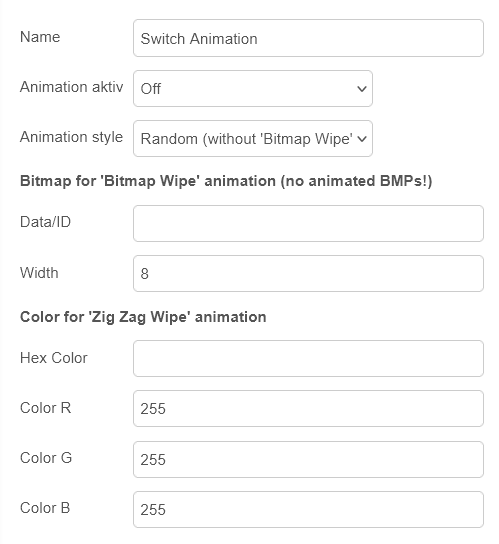
- Name: This value can be chosen as you like.
- Animation active: Enables or disables the transition animation.
- Animation style: Here you can set the style of the transition animation.
# Text
Set text, color, position, scrolling and alignment.
The firmware font supports these special characters:
€ ← ↑ → ↓ ★ 📁 ♥ ↧ 🚗 😀

# Configuration
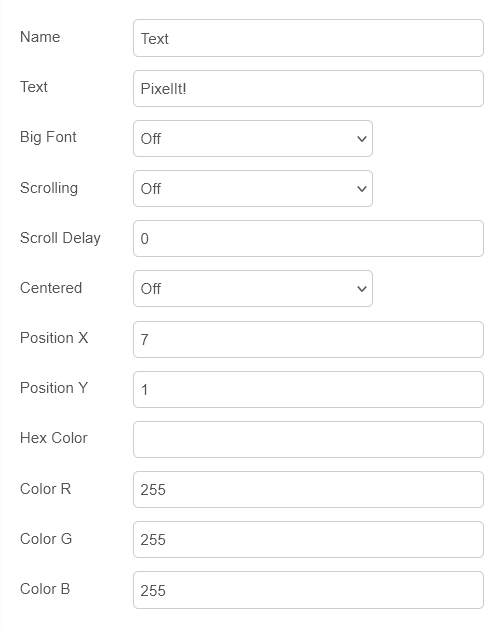
- Name: This value can be chosen as you like.
- Text: The text that should be displayed on the screen. You can also pass the text dynamically by passing the message property in double braces. Set
msg.payloadand access it with{{payload}}. - Big Font: Select the text font. In package 0.5.3, normalize
msg.text.bigFontto booleanfalseortruein a Function node after Text, as shown in the beginner flow; send JSON booleans rather than strings. - Scrolling: If the text should be scrolled. If you select
Auto, the text will be scrolled if it is longer than the screen width. - Scrolling Delay: The delay between the scrolling steps in milliseconds.
- Center Text: Center text in the available space to the right of Position X.
- Position X: The X position of the text.
- Position Y: The Y position of the text.
- Color: The color of the text.
# Bitmap
Set a bitmap's pixel data or gallery ID, dimensions and position. Core resolves gallery IDs through the external service and caches the result. Inline arrays must contain one RGB565 integer for each pixel.
# Configuration
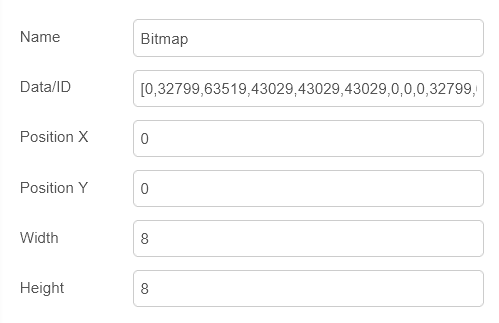
- Name: This value can be chosen as you like.
- Data/ID: The pixel array of the bitmap or the ID of the bitmap.
- Position X: The X position of the bitmap.
- Position Y: The Y position of the bitmap.
- Width X: The width of the bitmap.
- Height Y: The height of the bitmap.
# Bitmap Animation
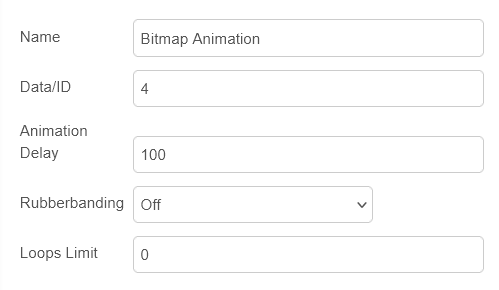
Build a bitmap animation. For PixelIt 2.6.0, use 8×8 frames and at most nine frames, as described in the firmware API. The extension can generate 32×8 animation payloads, but that does not make them compatible with the stable firmware's 64-pixel frame buffer.
# Configuration
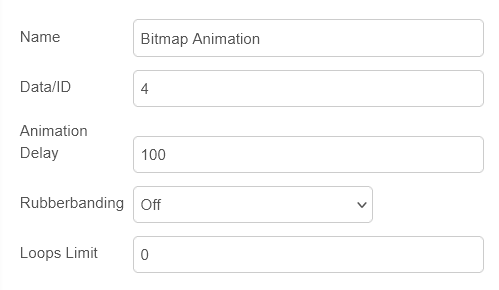
- Name: This value can be chosen as you like.
- Data/ID: The pixel array of the bitmap or the ID of the bitmap.
- Animation Delay: The delay between the frames of the animation in milliseconds.
- Rubberbanding: If the animation should be played in reverse after it has been played.
- Limit Loops: The number of loops the animation should be played.
0means infinite.
# Clock
Display the firmware clock using the time maintained by PixelIt. This continues to update on the device between Node-RED messages. Text nodes can also use dynamic message values, but do not create a ticking device clock.
# Configuration

- Name: This value can be chosen as you like.
- Date Time Switch: Enables or disables switch between date and time.
- With Seconds: Enables or disables the seconds.
- Switch Sec: The number of seconds after which the switch between date and time should take place.
# GPIO Control

With this node you can control the GPIOs of PixelIt. You can set the GPIOs to On (HIGH) or Off (LOW) and the duration in milliseconds.
# Configuration
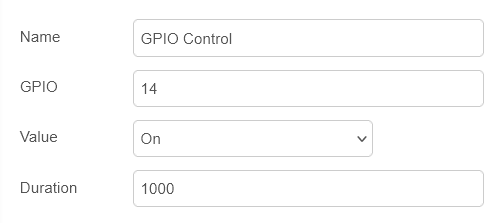
- Name: This value can be chosen as you like.
- GPIO: The GPIO number.
- Value: The state of the GPIO.
OnorOff. - Duration: The duration in milliseconds.
# Sound
Control a connected DFPlayer Mini. This node sets volume, playback command, folder and file; it has no duration field.
# Configuration
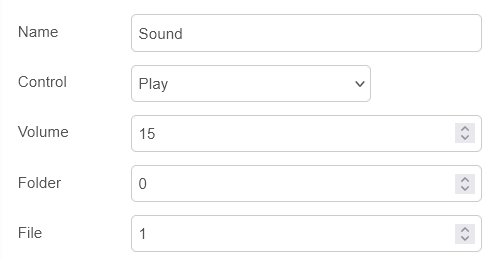
- Name: This value can be chosen as you like.
- Control: What you want to do.
play,pause,nextorprevious. - Volume: DFPlayer volume from
0to30. - Folder: Folder number;
0selects playback without a folder argument. - File: Track number. See the sound API for the two playback modes.
# Troubleshooting
See Troubleshooting.
← Tools Home Assistant →