# Firmware
Note: For Wemos D1 mini (Clone) (see Part list) you need the XXX_d1_mini.bin firmware.
# Flashing (Web)
Select the hardware you are using and then press the connect button.
Flasing ESP32
When you flash a ESP32 based board the first time or change the complete firmware, choose the "first install" firmware. After that you can use the "normal" firmware or the "OTA" firmware upgrade from the WebUI.
# Flashing ESP8266 (Windows)
To flash the Wemos D1 Mini (or simillar ESP8266 board) we use the ESPEasy Flasher for simplicity. After unpacking the ESPEasy_Flasher.zip only the current firmware_XXX.bin must be copied into the folder of the ESPEasy Flasher.
Now we have two dropdown menus after starting the FlashESP8266.exe:
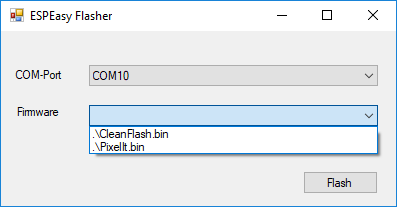
# COM-Port
Here you have to select the port where you have connected your Wemos D1 mini (or simillar ESP8266 board).
# Firmware
Now here we have two items the CleanFlash.bin and firmware_XXX.bin:
CleanFlash.binHas the task to zero the complete flash of the ESP, which can be very helpful if the ESP was already used for other projects and makes problems with the current project (e.g. no hotspot opens)firmware_XXX.binIs the firmware of the PixelIt 😃
Now you just have to press the Flash button and wait a bit.
# Flashing (macOS)
# Install esptool
Install esptool (e.g. via homebrew)
brew install esptool
# Find your board
Connect your board via USB, and get the device address by running:
ls /dev/tty*usb*
This should output something like:
/dev/tty.usbserial-1337
# Erase and flash the firmware
Erase flash
esptool.py --port /dev/tty.XXX erase_flash
Flash firmware
esptool.py --port /dev/tty.XXX --baud 1000000 write_flash --flash_size=4MB -fm dio 0 firmware_XXX.bin
# Flashing (Linux)
Install esptool (e.g. via pip)
pip install --upgrade esptool
# Find your board
Connect your board via USB, and get the device address by running:
ls /dev/ttyUSB*
This should output something like:
/dev/ttyUSB0
# Erase and flash the firmware
Erase flash
esptool.py --port /dev/ttyXXX erase_flash
Flash firmware
esptool.py --port /dev/ttyXXX --baud 1000000 write_flash --flash_size=4MB -fm dio 0 firmware_XXX.bin
# Setup
After flashing, the PixelIt should now set up its own WiFi AccessPoint (SSID: PIXELIT). If you have connected to this AP, you can enter and save the WiFi data of your network. If everything has worked and the PixelIt is connected to the WiFi and the Internet, you should now see a time.
Now you can connect to the Webinterface of PixelIt. Find the IP-Adress in your routers DHCP lease list or try the default hostname of PixelIt pixelit to finish the setup in the Options.
Now the next step should be to look at the Tools to see the available options for creating ads (most called Screens here).
# Troubleshooting
See Troubleshooting.
← Hardware Webinterface →